
InDesign is a powerful design tool used by professionals to create various document layouts, from magazines to brochures and books. A key feature in InDesign is facing pages, which is excellent for multi-page documents like books and magazines. However, you may sometimes need to turn off facing pages.
This is important when creating documents that won’t be bound together. This guide will explain how to turn off facing pages in InDesign, work with single pages, and provide tips on optimizing your workflow.
Understanding Facing Pages in InDesign
What Are Facing Pages in InDesign?
InDesign’s facing pages feature displays two pages next to each other as a spread. This feature is commonly used for documents such as books, magazines, and catalogues, where the content flows across both pages of the spread. When facing pages are on, InDesign places the left and right pages side by side. This lets designers create a smooth layout that flows across both pages.
The Purpose of Facing Pages in Page Layouts
The primary benefit of facing pages is for bound documents, where you want the pages to appear as they would in a physical book or magazine. Facing pages help designers create layouts across two pages. This makes it easier to align text and images, ensuring a smooth reading experience.
Common Uses of Facing Pages in InDesign
InDesign’s facing pages feature is most often used for creating books, magazines, brochures, and other multi-page documents intended to be bound. This feature allows for a natural and visually appealing flow of content. Additionally, it can simulate the look of an open magazine or spread, which is useful for showcasing products, designs, or ads in editorial formats.
Why and When to Turn Off Facing Pages in InDesign
Understanding the Impact of Facing Pages
Although facing pages are helpful for multi-page, bound layouts, they can be limiting when working on single-page layouts. For example, if you’re making a single-page flyer, facing pages can cause issues. It can restrict your layout options, especially when setting up margins and guides.
When to Use Single Pages Instead of Spreads
Sometimes, the design requirements dictate that you use single pages rather than spreads. This is common when creating documents like flyers, postcards, or other materials that don’t require a two-page spread. Turning off facing pages allows you to focus on individual pages, providing greater flexibility in layout design.
Benefits of Turning Off Facing Pages
Turning off facing pages in InDesign offers several advantages, mainly when designing documents that don’t need to be printed or bound as spreads. Some of the benefits include:
- Greater control over individual pages.
- Easier adjustments to margins, columns, and content alignment.
- Simplified page navigation in the pages panel.
- Flexibility in working with page icons for each page, allowing users to assign different layouts for different types of content.
How to Turn Off Facing Pages in InDesign
Step-by-Step Guide to Turning Off Facing Pages
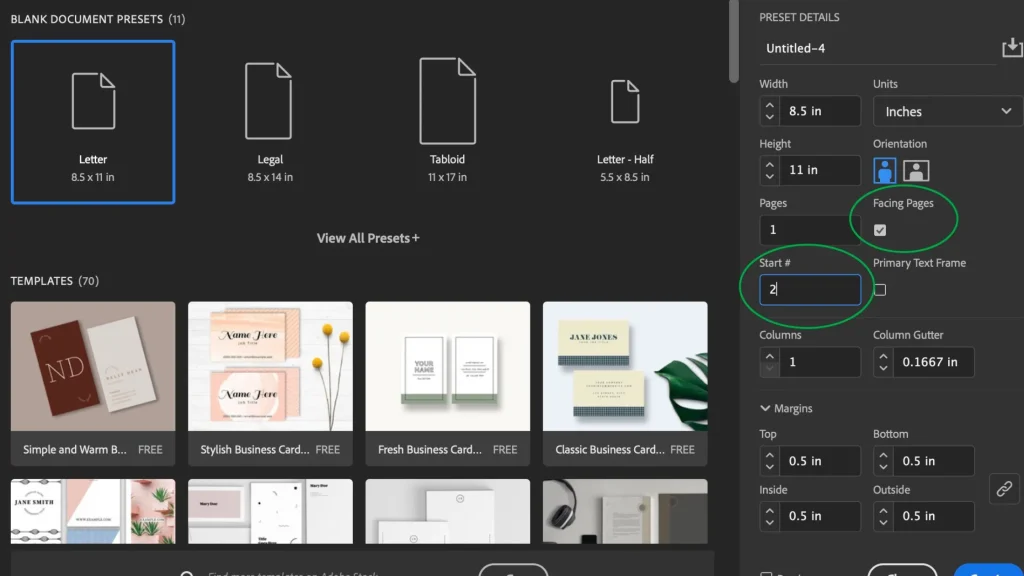
Turning off facing pages in InDesign is easy and can be done through the Document Setup dialogue box. Here’s how you can do it:
- Create a New Document: Open Adobe InDesign and go to the File Menu. Select New > Document to open the New Document Dialog box.
- Disable Facing Pages: In the New Document dialog box, uncheck the Facing Pages option. This will switch your document from spreads to single pages.
- Adjust Your Layout: Once facing pages are turned off, you can begin designing your single-page document. You can add pages or adjust the layout as necessary without the constraints of facing pages.
- Click OK: After making the changes, confirm the settings and open your document.
Changing Document Settings to Disable Facing Pages
If you are working on an existing document and want to turn off facing pages after it has been created, you can change the settings by following these steps:
- Go to the File Menu and select Document Setup.
- In the Document Setup Dialog Box, uncheck the Facing Pages option.
- Click OK to apply the changes.
By turning off facing pages, you will now be working with single pages, which can help you achieve more control over each page’s design.
Troubleshooting: What to Do If Facing Pages Won’t Turn Off
In rare cases, you might encounter issues where InDesign won’t allow you to turn off facing pages. Here are some troubleshooting steps:
- Check the Document Preset: Ensure that the document preset or page format does not include restrictions on page layout.
- Inspect the Layout: Check the layout settings under the Properties Panel to ensure the page format is set to single pages.
- Reopen the Document: Reopening the document after changing the settings can help apply the new layout configuration.
Working with Single Pages After Turning Off Facing Pages
How to Create New Single Pages in Your Document
Once you have turned off facing pages, you can easily create new pages in your document. To add a new page:
- Go to the Pages Panel.
- Right-click on a page thumbnail and select New Page.
- Choose whether you want to add the page at the beginning, end, or between existing pages.
Adding single pages lets you focus on designing each page individually, giving you more freedom and flexibility.
Adjusting Layouts for Single Pages
You’ll want to adjust your layout when working with single pages. Some things to consider include:
- Margins and Guides: With facing pages disabled, you must manually adjust your margins and guides for each page.
- Text and Images: You may want to place text and images in ways optimized for individual page layouts rather than spreads.
How to Select and Work with Individual Pages
The Pages Panel in InDesign is a powerful tool for selecting and navigating individual pages. Here’s how to make the most of it:
- Selecting Pages: Click on the page icon in the Pages Panel to select and navigate to that page.
- Page Adjustments: Once a page is selected, you can change its layout, text, or images. With facing pages turned off, you can treat each page as an isolated entity without worrying about the design of the opposite page.
Adjusting Your InDesign Layout After Disabling Facing Pages
Changing the Default Layout for Pages and Spreads
When facing pages are disabled, your layout settings will default to a single-page format. If you want to customize the design further, you can adjust the layout:
- Use the Document Setup dialogue box to modify the document format.
- You can also go into the Layout menu to adjust settings like the number of columns, margins, and gutter space.
How to Adjust Margins and Guides for Single Pages
With facing pages turned off, you’ll have more control over each page’s margins and guides. To adjust them:
- Go to the Layout menu.
- Select Margins and Columns.
- Set the desired margins and guides for your page layout.
Color and Design Changes for Single-Page Layouts
When working with single pages, you should adjust each page’s colour and design elements separately. This is especially important when designing flyers, posters, or other one-page marketing materials. You can customize the colours, typography, and images without worrying about the layout of a second page.
Tips for Efficient Page Management in InDesign
Organizing Thumbnails for Easier Navigation
The Pages Panel becomes essential for managing and navigating your document when dealing with multiple pages. You can organize the thumbnails of pages for quicker access. By adjusting the panel display settings, you can easily see a preview of each page and make faster adjustments to the content.
Customizing Page Spreads for Specific Layout Needs
In cases where you need a spread but don’t want facing pages enabled, you can manually create custom spreads. This can be done by positioning two pages next to each other in the Pages Panel, allowing you to simulate the appearance of a spread without enabling facing pages.
Turning Off Facing Pages vs. Working with Master Pages
InDesign also allows for using master pages to apply layout elements across multiple pages. If you’re trying to turn off facing pages, it’s essential to differentiate between adjusting the page settings and using master pages to maintain consistent design elements across single pages.
Also Read: How to Build PBN Links: The Complete Guide for SEO Success
Learning More About InDesign Layout Features
Recommended Tutorials for InDesign Page Layouts
For those wanting to learn more about page and layout management in InDesign, Adobe offers a range of tutorials and resources. The Adobe Community is also a great place to find helpful tips, tutorials, and discussions related to document design and layout. You can find tutorials for both single pages and spreads in InDesign. They cover basic and advanced techniques.
Advanced Features for Managing Pages and Spreads
Once you’re comfortable with turning off facing pages, you can explore advanced features in InDesign for managing pages and spreads. These features include document templates, advanced page numbering, and easy assignment of content across multiple pages.
Best Practices for Using InDesign for Document Layouts
To ensure optimal design, it’s essential to follow best practices for page layout in InDesign:
- Always set your document up correctly at the beginning.
- Use the Pages Panel effectively to organize and navigate your pages.
- Keep your design elements consistent by using master pages and styles.
Mastering Page and Spread Management in InDesign
Turning off facing pages in InDesign can significantly improve your design workflow with single pages instead of spreads. Following this guide, users can quickly disable facing pages, adjust page settings, and design more flexible layouts. Whether you’re creating a magazine, flyer, or standalone document, mastering the use of pages and spreads in InDesign will help you create professional and visually compelling designs.